D365 Finance and Operations disable the flight feature in a Tier-1 environment.

When we recently were updating one of our Tier-1 environments to 10.0.31 version we faced an issue with WHS mobile app.

The mobile app reverted to the login screen after trying to go to a specific menu. We tried the following options in order to resolve the issue:

  • Delete all user sessions from Warehouse management > Inquiries and reports > Mobile device logs > Work user sessions.
  • Delete and recreate the mobile app user configured/used for your tests (Warehouse management > Setup > Worker)

After an investigation we realized that the issue was rooting in Issue 704649 - Warehouse mobile app gives error "The size of the XML request exceeds the maximum valued allowed". This code changes controls with the flight WHSMobileAppXMLSizeValidationFlight.

So we decided to disable this flight by using the SYSFLIGHTING table. The procedure is nicely described in an old post I found here, I will adjust the procedure to our case.

For this purpose it is needed to add a record with the field Enabled = 1 for the kill switch for the flight, meaning for WHSMobileAppXMLSizeValidationFlight_KillSwitch.

Below specific steps to follow to enable the kill switch for the flight:

1. Add a record with this Insert statement for SYSFLIGHTING table, but please replace the appropriate values:

INSERT INTO SYSFLIGHTING VALUES ('FlightName', 1, 12719367, Partition, RecID, 1)

Note: After replacing 'FlightName' with the actual flight name, the values are/should be:

- 1 stands for Enabled

- 12719367 is the Flight service ID

- Partition = partition ID from your environment which can be obtained by querying (select) for any record. Every record will have a partition id which must be copied and used here.

- RecID = same ID as partition(*) (If there is no other record in SYSFLIGHTING table, then it can be one. Or you can can find one by executing "SELECT max(recid)+1 from SysFlighting")

- 1 is for the RecVersion

- actually, the SQL query could also be much simpler, like this

INSERT INTO SYSFLIGHTING ([FLIGHTNAME],[ENABLED],[FLIGHTSERVICEID]) VALUES ('WHSMobileAppXMLSizeValidationFlight_KillSwitch', 1, 12719367)

2 Verify that C:\AOSService\webroot\web.config has the correct DataAccess.FlightingServiceCatalogID. You should find a line with this key and a value of 12719367. If not, update accordingly the file and save it.

Notes:

Having web.config file in the environment is a clear indication that key DataAccess.FlightingServiceCatalogID should have value 12719367 and this value should be used also in the SQL statement from above for the FLIGHTSERVICEID field value.

If web.config file is not present in the environment, but AXService.config file is present (see next note), it is a clear indication that environment is like an On-Premise deployment (which might be the case also for dev boxes or environments that are not Microsoft managed, but still on Microsoft cloud). In this scenario, see the next note with important differences.

Notes: (not having web.config file in the environment):

Verify that C:\ProgramData\SF\AOS_182\Fabric\work\Applications\AXSFType_App641\AXSF.Code.1.0.20200715180202\AXService.config has the correct DataAccess.FlightingServiceCatalogID. You should find a line with this key and a value of 0. If not, update accordingly the file and save it.

The AXService.config file path might be different (accordingly to your installation).

Having AXService.config file in the environment is a clear indication that key DataAccess.FlightingServiceCatalogID should have value 0 and this value should be used also in the SQL statement from above for the FLIGHTSERVICEID field value.

So, the SQL query should be like this:

INSERT INTO SYSFLIGHTING ([FLIGHTNAME],[ENABLED],[FLIGHTSERVICEID]) VALUES ('WHSMobileAppXMLSizeValidationFlight_KillSwitch', 1, 0)

3. Restart IIS and batch service

P.S. The issue was reported to Microsoft and it can be solved in 10.0.33 version.


D365 Finance and Operations. How to get the RecId sequence of the table via X++.

In D365 RecID there is a SQL system sequence now. SQL itself maintains the IDs. I found a post on this topic. 

Using SQL commands described there, I created an X++ method in order to get the sequence name of the table.

It can be useful if you develop a data upgrade script and it is needed to align the sequence when data is moved ‘as is’ to the target D365 table.

public str getSequenceProcedureName(TableName   _tableName)

{
   str         result;
   str         ret;
   TableId     tableId;


   if (this.isTablePresent(_tableName))
   {
       str sqlQuery = strFmt(@"
                SELECT ID from TABLEIDTABLE
                    JOIN sys.sequences ON sys.sequences.name = CONCAT('SEQ_', TABLEIDTABLE.ID)
                    WHERE TABLEIDTABLE.NAME = '%1'",
                    _tableName);


       result  =  ReleaseUpdateDB::statementExeQuery(sqlQuery);

       if (result)

       {
          tableId = str2Int(result);


          if (tableId)
          {
             ret = strFmt('SEQ_%1',tableId);
          }
       }
    }
 
    return ret;

}

D365 Finance and Operations. How to get the numeric value of the extensible enum via X++.

There are 2 enum types in the system from an extensibility perspective – extensible and non-extensible. The difference is briefly explained here. There is a short recap below:

In D365FO enums that are not extensible keep the numeric value of each element in the metadata. 

However, extensible enums do not use metadata to store their numeric values. Instead, these values are stored in the database and are assigned dynamically by the database synchronization process.

The ENUMIDTABLE table stores the base enum ids, while the ENUMVALUETABLE table stores the numeric values assigned to every element of the base enum. While the ENUMIDTABLE table contains records for every base enum in the system, ENUMVALUETABLE is only populated for extensible enums.

In case we need to get the numeric value of the extensible enum the following method can be useful:

public Integer getEnumValue(str     _enumName,

                            str     _enumValueName)
{
   Integer     ret;


   if (_enumName && _enumValueName)
   {
      str sqlQuery = strFmt(@"SELECT ENUMVALUE from ENUMVALUETABLE
                            join ENUMIDTABLE on enumid = id
                            and ENUMIDTABLE.NAME    = '%1'
                            and ENUMVALUETABLE.NAME = '%2'",
                            _enumName,
                            _enumValueName);


       str result   =  ReleaseUpdateDB::statementExeQuery(sqlQuery);
       if (result)
       {
           ret = str2Int(result);
       }
   }
      
   return ret;
}

Data upgrade from Ax 2012 to Dynamics 365 Finance and Operations. Migrate inventory dimensions.

Recently one of the customers asked me if a data migration from Ax 2012 to the latest finance and operations version is possible. The Ax 2012 solution has additional inventory dimensions that migrated to the D365 from a code perspective. While investigating the issue I faced some issues and I would like to share my experience regarding inventory dimensions data upgrade. I hope it will save your time.

The documentation regarding the data upgrade process is pretty clear and there is a separate page related to the troubleshooting upgrade scripts experience.

During the data migration in development environment, I faced the same error as mentioned on the troubleshooting page:

The CREATE UNIQUE INDEX statement terminated because a duplicate key was found for the object name 'dbo.INVENTDIM' and the index name 'I_698SHA1HASHIDX'. The duplicate key value is (5637144576, USMF, B92BAF2504FD67FC15A56F2DFACE09127715B54B). The statement has been terminated. CREATE UNIQUE INDEX I_698SHA1HASHIDX ON DBO.INVENTDIM(PARTITION,DATAAREAID,SHA1HASHHEX) WITH (MAXDOP = 1)

It was unexpected since a special inventory dimension data migration script was developed. When I run the recommended query to verify the script, this is what appears:

SELECT PARTITION, DATAAREAID, SHA1HASHHEX, COUNT(*)
FROM INVENTDIM
GROUP BY PARTITION, DATAAREAID, SHA1HASHHEX
HAVING COUNT(*) > 1

The query returned many records. In fact, it means that the SHA1HASHHEX field values were not generated as unique. In my opinion, there can be two reasons except those described in the documentation: The values of InventDimension* fields are not taken into consideration with the ReleaseUpdateDB72_Invent::updateSHA1HashHexInInventDim method or the InventDimension* fields are empty.

In my case, the reason was that the appropriate configuration keys InventDimension* are disabled in the system by default. Even if I violated the system and copied the data from Ax 2012 inventory dimensions fields to the appropriate InventDimension* fields via direct SQL, the script still looks like this:

[
  UpgradeScriptDescription("Script description"),
  UpgradeScriptStage(ReleaseUpdateScriptStage::PreSync),
  UpgradeScriptType(ReleaseUpdateScriptType::StandardScript),
  UpgradeScriptTable(tableStr(InventDim), false, true, true, false)
]
public void updateInventDimensionField()
{
    FieldName     field2012Name  = 'YOURDIMENSIONFIELD';
  FieldName     field365Name   = 'INVENTDIMENSION1';
  SysDictTable  inventDimDT    = SysDictTable::newTableId(tableNum(InventDim));
  TableName     inventDimName  = inventDimDT.name(DbBackend::Sql);

  str sqlStatement = strFmt(@"

                UPDATE [dbo].[%1]
                SET [dbo].[%1].[%2] = [dbo].[%1].[%3]
                WHERE [dbo].[%1].[%3] <> ''",
                inventDimName,
                field365Name,
                field2012Name);
   
  ReleaseUpdateDB::statementExeUpdate(sqlStatement);
}

The system did not use its values with the generate hash values method and the above-mentioned synchronization issue appeared.

In order to fix this issue, the required configuration keys should be activated during the data upgrade. In order to perform it, the following method can be used:

[

  UpgradeScriptDescription("Enable inventory dimension configuration keys"),
  UpgradeScriptStage(ReleaseUpdateScriptStage::PreSync),
  UpgradeScriptType(ReleaseUpdateScriptType::StartScript),
    Microsoft.Dynamics.BusinessPlatform.SharedTypes.InternalUseOnlyAttribute
]
public void enablePreSyncInventDimensionConfigurationKeys()
{
  ConfigurationKeySet keySet = new ConfigurationKeySet();
  SysGlobalCache      cache = appl.globalCache();

  keySet.loadSystemSetup();

  keySet.enabled(configurationKeyNum(InventDimension1), true);
  keySet.enabled(configurationKeyNum(InventDimension2), true);

  SysDictConfigurationKey::save(keySet.pack());

  SysSecurity::reload(true, true, true, false, false);

}

When the above- mentioned method is used and a data transfer between Ax 2012 and D365 InventDim fields is completed (It should be done at the PreSync step, otherwise the Ax 2012 InventDim custom fields will be deleted at the DbSync step), the ReleaseUpdateDB72_Invent::updateSHA1HashHexInInventDim method should generate hash values correctly and the synchronization issue should be resolved.

Additionally, I recommend updating other tables that contain InventDim field ids from Ax2012 version since InventDimension* fields in D365 have other field id values. I believe every system may have various setups and customizations. Therefore, from my point of view, it make sense to develop scripts for updating setups and the field id values of the InventDim table in the tables listed below:

  • WHSReservationHierarchyElement
  • EcoResStorageDimensionGroupFldSetup
  • EcoResTrackingDimensionGroupFldSetup   
  • EcoResProductDimensionGroupFldSetup 
The correct values in the InventDim table and in the tables listed above, as well as the enabled configuration keys, should help to avoid problems with data WHS* tables within the upgrade process.

Finally, if you see any of these errors after the data migration:

DECLARE @AVAILPHYSICAL numeric(32, 6) DECLARE @AVAILORDERED numeric(32, 6); EXECUTE WHSOnHandWithInventDim @DATAAREAID = N'USMF', @PARTITION = 5637144576, @ITEMID = N'ITEMIDXXX', @LEVEL = 6, @UPPERLEVELOFMINIMUMCALCULATION = 0, @INVENTSITEID = N'1', @INVENTSITEIDLEVEL = 1, @INVENTLOCATIONID = N'16', @INVENTLOCATIONIDLEVEL = 2, @INVENTSTATUSIDLEVEL = 3, @INVENTBATCHIDLEVEL = 4, @INVENTDIMENSION1 = N'DIMENSIONVALUE', @INVENTDIMENSION1LEVEL = 5, @WMSLOCATIONID = N'12', @WMSLOCATIONIDLEVEL = 6, @AVAILPHYSICAL = @AVAILPHYSICAL output, @AVAILORDERED = @AVAILORDERED output ; SELECT @AVAILPHYSICAL as [AVAILPHYSICAL], @AVAILORDERED as [AVAILORDERED];

Microsoft][ODBC Driver 17 for SQL Server][SQL Server]@INVENTDIMENSION1 is not a parameter for procedure WHSOnHandWithInventDim.

It means the WHSOnHandWithInventDim and WHSOnHandWithDelta procedures were not adjusted to the current dimension configuration setups. It could happen if at the final database synchronization step during the data migration process the required configuration keys were not enabled. In order to fix this error, you can run the code via a job:

WHSOnHandSPHelper::syncDBStoredProcedures();

It should align the mentioned stored procedures to the current activated InventDimension* configuration keys and the errors should no longer be.

D365 Finance and Operations. Get path for the menu item via code.

In one of my previous posts, I have shared an idea of how a new Dynamics 365 SCM and Finance API can be used to get metadata of Dynamics 365 AOT elements. 

Learning a path to a menu item from a user interface perspective could come in handy.

So I have created the method that I would like to share:

public static str getMenuItemPath(str _menuItemName)
{
   MenuFunction mf = new MenuFunction(_menuItemName, MenuItemType::Display);
   str          menuLabel;
   str          ret;

   boolean iterateMenus(SysDictMenu _menu)

   {
      SysMenuEnumerator       menuEnum = _menu.getEnumerator();
      SysDictMenu             subMenu;
      boolean                 found;

      while (menuEnum.moveNext())

      {
         subMenu = menuEnum.current();
         if (subMenu.isMenu() || subMenu.isMenuReference())
         {
            found = iterateMenus(subMenu);

            if (found) // If found, just climb back up the stack

            {
               menuLabel = strFmt('%1/%2', subMenu.label(), menuLabel);

               return found;

            }
         }
         else
         {

            if (subMenu.isMenuItem()

             && subMenu.isValid()
             && subMenu.isVisible()
             && subMenu.menuItem().name() == mf.name()
             && subMenu.menuItem().type() == mf.type())
            {
               menuLabel = subMenu.label();

               return true;

            }
         }
      }

      return false;

   }

   If (iterateMenus(SysDictMenu::newMainMenu()))

   {
      ret = strfmt('%1', menuLabel);
   }

   return ret;

}

You can find a couple of examples of using the method presented above, below :

1. info(strFmt('%1', Class::getMenuItemPath('SalesTableListPage')));

It will return the result: Accounts receivable/Orders/All sales orders


2. info(strFmt('%1', Class::getMenuItemPath(menuItemDisplayStr(InventLocations))));

It will return the result: Inventory management/Setup/Inventory breakdown/Warehouses


Installation of Microsoft Dynamics 365 for Finance and Operations software deployable package on a development environment (one that is not connected to LCS)

As you may know the development environment can be hosted on LCS or deployed as virtual machine on your laptop. In my case, I use the laptop in order to host my development virtual machine.  Since Microsoft releases about 10 updates every year I install them periodically in my dev box.

The installation process of the deployable package is described in the standard documentation. All key terms and definitions are perfectly explained there. 

I would like to share my experience of the installation process for the standard “all in one” virtual machine. I hope it can be useful and save your time. 

So let’s start.

1. Download the software deployable package from LCS on the virtual machine (VM) in a non-user folder.

2. After the zip file is downloaded, right-click it, and then select Properties. Then, in the "Properties" dialog box, on the "General" tab, select "Unblock" to unlock the files. (https://community.dynamics.com/ax/f/33/t/244550)

3. Extract the files to a folder. Here we will use C:\Temp\PU20\AXPlatformUpdate folder as an example.

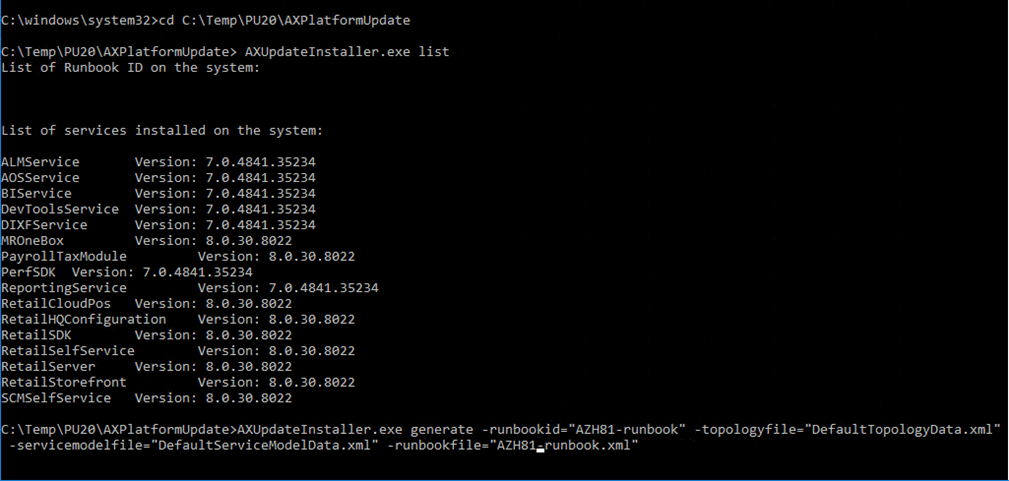
4. Open a Command Prompt window “as Administrator” mode and change the folder with the command: cd C:\Temp\PU20\AXPlatformUpdate

5. Execute the command: AXUpdateInstaller.exe list It will show the list of installed components:


All listed components should be added to the DefaultTopologyData.xml file. This file is placed in the same C:\Temp\PU20\AXPlatformUpdate folder. If we open this file with Notepad, it must look like this:


It is needed to add the list of the components to the DefaultTopologyData.xml file.

6. Generate the runbook file that will provide step-by-step instructions for updating the VM. In our case the command for generating the runbook file will be: 
AXUpdateInstaller.exe generate 
-runbookid="AZH81-runbook" 
-topologyfile="DefaultTopologyData.xml" 
-servicemodelfile="DefaultServiceModelData.xml" 
-runbookfile="AZH81-runbook.xml"


runbookID – A parameter specified by the developer, it applies the deployable package.
topologyFile – The path of the DefaultTopologyData.xml file.
serviceModelFile – The path of the DefaultServiceModelData.xml file.
runbookFile – The name of the runbook file to generate (for example, AZH81-runbook.xml).

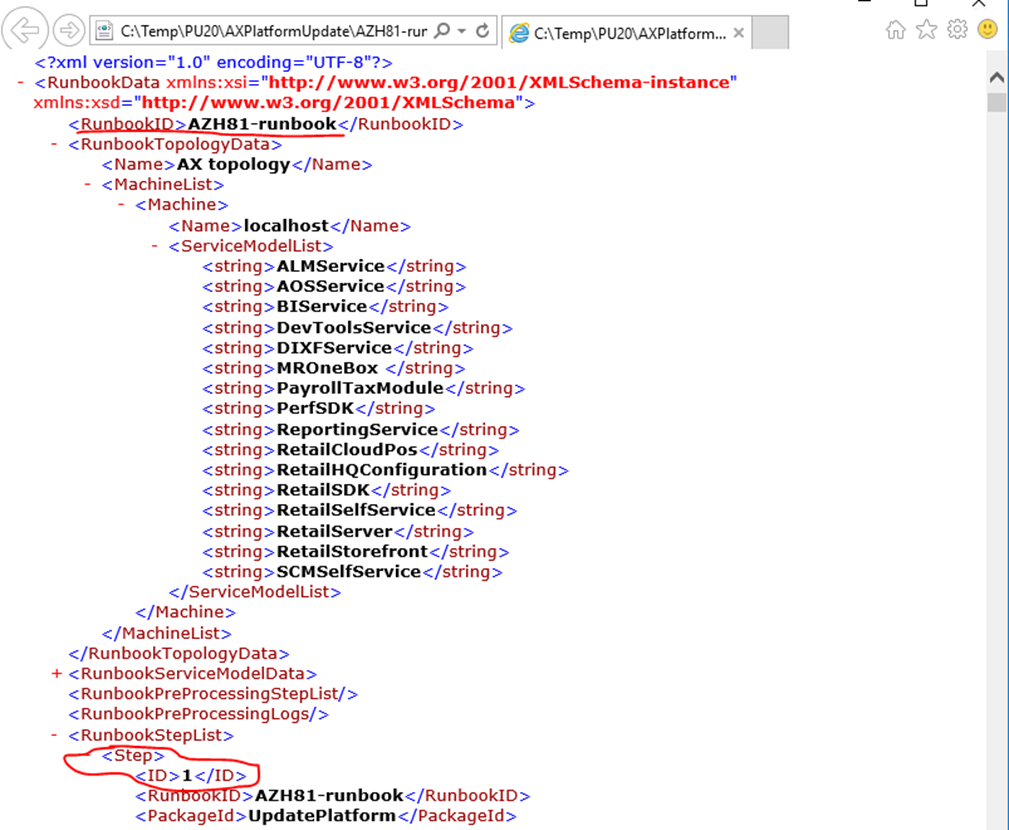
After executing the command the file AZH81-runbook.xml will be created in the C:\Temp\PU20\AXPlatformUpdate folder. If we open the created file, it will look like:


7. Verify that everyone has full permissions for the C:\Temp\PU20\AXPlatformUpdate folder and remove the “Read only” property for the mentioned folder.

8. Import the runbook by running the following command: 
AXUpdateInstaller.exe import -runbookfile="AZH81-runbook.xml"

9. Run the runbook by running the following command:
AXUpdateInstaller.exe execute -runbookid=AZH81-runbook
While running the process, messages as on the screenshot below should appear:


Note: If step in the runbook fails, you can rerun it by running the following command:
AXUpdateInstaller.exe execute -runbookid=“AZH81-runbook” -rerunstep=6
The example above is provided for the case if step №6 has failed.

My troubleshooting experience

Database synchronization fails

Executing step: 24

GlobalUpdate script for service model: AOSService on machine: localhost

Sync AX database
The running command stopped because the preference variable "ErrorActionPreference" or common parameter is set to Stop: System.Management.Automation.RuntimeException: An exception of type System.Net.WebException occurred when making an http request to: http://127.0.0.1/ReportServer. Refer to the log file for more details.
The step failed
The step: if 24 failed, you can use rerun step command to debug the step explicitly
at Microsoft.Dynamics.AX.AXUpdateInstallerBase.RunbookExecutor.ExecuteRunbookStepList(RunbookData runbookData, String updatePackageFilePath, Boolean silent, String stepID, ExecuteStepMode executeStepMode, Boolean versionCheck, Parameters parameters)
at Microsoft.Dynamics.AX.AXUpdateInstallerBase.AXUpdateInstallerBase.execute(String runbookID, Boolean silent, String updatePackageFilePath, IRunbookExecutor runbookExecutor, Boolean versionCheck, Parameters param)
at Microsoft.Dynamics.AX.AXUpdateInstaller.Program.InstallUpdate(String[] args)
at Microsoft.Dynamics.AX.AXUpdateInstaller.Program.Main(String[] args)
OR 
Executing step: 24
GlobalUpdate script for service model: AOSService on machine: localhost
Sync AX database
The running command stopped because the preference variable "ErrorActionPreference" or common parameter is set to Stop: System.Management.Automation.RuntimeException: An exception of type System.Net.WebException occurred when making an http request to: http://127.0.0.1:80/ReportServer. Refer to the log file for more details.
The step failed

The very first time this appeared in PU 30 and it is still happening. To fix this issue AutoDeployReportAndSyncDB.ps1 file needs modification. In our example it will be in: 
C:\Temp\PU20\AXPlatformUpdate\AOSService\Scripts\AutoDeployReportAndSyncDB.ps1

After the  #db sync add the command:  invoke-Expression "net start reportserver"

#db sync 
invoke-Expression "net start reportserver"

Save the changes and rerun the failed step by running the following command:  
AXUpdateInstaller.exe execute -runbookid=“AZH81-runbook” -rerunstep=24

Timeout error

Executing step: 24
GlobalUpdate script for service model: AOSService on machine: localhost
Sync AX database
The step execution time exceed the timeout value specified: 120min
The step failed.

It might happen if your local hosted virtual machine does not have enough performance. It can happen on any step and be fixed in the same way. Increasing the timeout value for the appropriate step is advisable.

In order to resolve this particular issue you need to modify the runbook file. In our example it is AZH81-runbook.xml file from folder C:\Temp\PU20\AXPlatformUpdate. It is needed to find the following section of the file and increase the TimeoutValue value:

<GlobalUpdateScript>
          <FileName>AutoDeployReportAndSyncDB.ps1</FileName>
          <Automated>true</Automated>
          <Description>Sync AX database</Description>
          <RetryCount>0</RetryCount>
          <TimeoutValue>120</TimeoutValue>
          <InvokeWithPowershellProcess>false</InvokeWithPowershellProcess>
          <DynamicStepDefinition />
  </GlobalUpdateScript>

For example, we can set 720 minutes:

<GlobalUpdateScript>
          <FileName>AutoDeployReportAndSyncDB.ps1</FileName>
          <Automated>true</Automated>
          <Description>Sync AX database</Description>
          <RetryCount>0</RetryCount>
          <TimeoutValue>720</TimeoutValue>
          <InvokeWithPowershellProcess>false</InvokeWithPowershellProcess>
          <DynamicStepDefinition />
  </GlobalUpdateScript>

Save the changes and rerun the failed step by running the following command:
AXUpdateInstaller.exe execute -runbookid=“AZH81-runbook” -rerunstep=24

If rerun of the process does not work, you need to import the runbook file by running the following command: AXUpdateInstaller.exe import -runbookfile="AZH81-runbook.xml"

And run the process from the very beginning by running the following command: AXUpdateInstaller.exe execute -runbookid=AZH81-runbook 

If it is not possible to run the process from the very beginning , you can restart the VM and run the process from the very beginning by running the following command: 
AXUpdateInstaller.exe execute -runbookid=AZH81-runbook

Batch Management Service error

If the Batch Management Service does not work and you can’t start it and you see the errors in Event Viewer as on screenshots below:

In addition, you get the error like those mentioned below:

Executing step: 63

Start script for service model: AOSService on machine: localhost
Start AOS service and Batch service
SUCCESS: The scheduled task "DynamicsServicingCopyStaging" has successfully been created.
Error during AOS start: Failed to start service 'Microsoft Dynamics 365 Unified Operations: Batch Management Service (DynamicsAxBatch)'. [Log: C:\Temp\PU20\AXPlatformUpdate\RunbookWorkingFolder\AZH81-runbook\localhost\AOSService\63\Log\AutoStartAOS.log]
The step failed
The step: if 63 failed, you can use rerunstep command to debug the step explicitly at Microsoft.Dynamics.AX.AXUpdateInstallerBase.RunbookExecutor.ExecuteRunbookStepList(RunbookData runbookData, String updatePackageFilePath, Boolean silent, String stepID, ExecuteStepMode executeStepMode, Boolean versionCheck, Parameters parameters)
at Microsoft.Dynamics.AX.AXUpdateInstaller.Program.InstallUpdate(String[] args)
at Microsoft.Dynamics.AX.AXUpdateInstaller.Program.Main(String[] args)

It means that your environment is in a maintenance mode. You should turn off the maintenance mode. (https://docs.microsoft.com/en-us/dynamics365/fin-ops-core/dev-itpro/sysadmin/maintenance-mode)
Then you can start the Batch Management Service and continue the updating process by running the following command: 
AXUpdateInstaller.exe execute -runbookid=“AZH81-runbook” -rerunstep=63


Microsoft announced the deprecation of Visual Studio 2022 for X++ development starting with Platform Update 74 (10.0.49)

Microsoft announced the deprecation of Visual Studio 2022 for X++ development. Starting with Platform Update 74 (10.0.49), Visual Studio 20...